Tissue paper is one of the harder surfaces a brand will ever ask a printer to reproduce a logo on. It is thin, uncoated, and absorbent, so ink soaks into the fibers rather than sitting on top the way it does on a coated mailer box. That single property drives most of the decisions that follow: which press runs your job, how many colors you can realistically use, and whether the gradient that looks elegant in your file survives contact with the sheet. Here is how custom tissue actually gets printed, and what each method asks of your artwork.
Flexography, the workhorse of tissue printing
Most custom printed tissue is produced by flexography. A raised photopolymer plate is made for each color, an anilox roller meters a thin, even film of ink onto that plate, and a continuous web of tissue passes through one print station per color. The economics follow directly from that setup: every spot color needs its own plate and station, so the number of colors, not the number of sheets, is the main cost driver. Flexo is excellent at what tissue does best, namely crisp line work and solid single- or two-color fills, and it becomes very cost-effective once volume climbs high enough to spread the plate cost. Its limiting factor is registration. Tissue is light and slightly stretchy, so holding several colors in tight alignment for fine, interlocking detail is genuinely difficult, which is why the cleanest tissue designs tend to be bold rather than intricate.
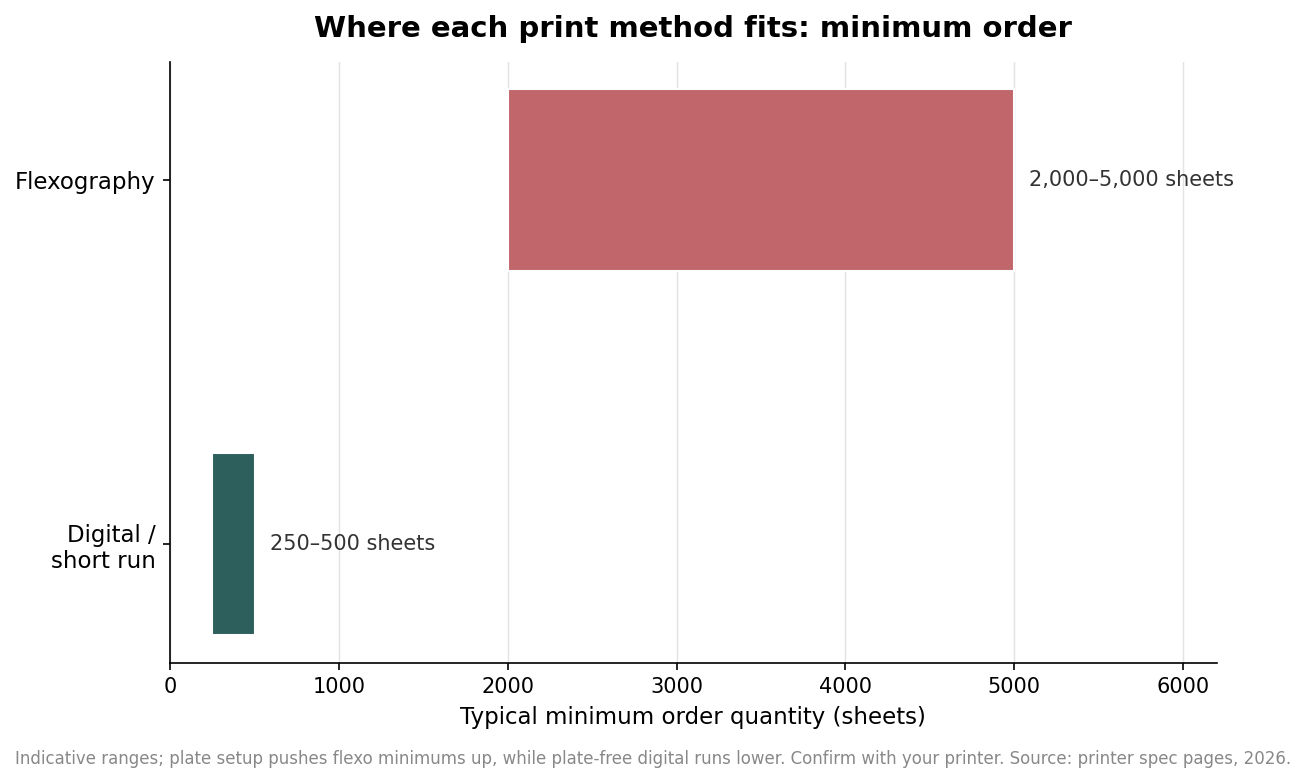
Because plates carry a fixed setup cost, flexo minimums usually start in the low thousands of sheets. If your run is smaller than that, the plate charge dominates the per-unit price and a different method makes more sense.
Digital and short-run routes
Digital presses skip plates entirely, laying down a four-color process image directly from your file. That removes the setup barrier, which is why digital minimums can drop to a few hundred sheets and why it is the sensible choice for a boutique launch, a seasonal variant, or a test before you commit to a large flexo run. Digital also handles full-color and photographic artwork that spot-color flexo cannot. The tradeoffs are that per-sheet cost stays higher as volume grows, so digital rarely wins at scale, and process ink on absorbent tissue can look softer than a punchy flexo spot color. Treat digital as the short-run and full-color option, and flexo as the volume and brand-color option.
The inks, and why opacity is the quiet variable
Tissue is typically printed with water-based or soy-based inks that are low in volatile compounds and dry by absorption and evaporation rather than aggressive solvents. The variable most people overlook is opacity. On white tissue, standard inks read true. On a natural, kraft, or colored base, a translucent ink lets the sheet color show through and shifts the result, so a white logo or a light pastel needs a dedicated opaque white or a metallic ink, each of which is effectively its own color on the press. If the tissue will wrap food or cosmetics, say so up front and ask for inks rated for that contact, because not every stock ink qualifies.
What reproduces well, and what fights the surface
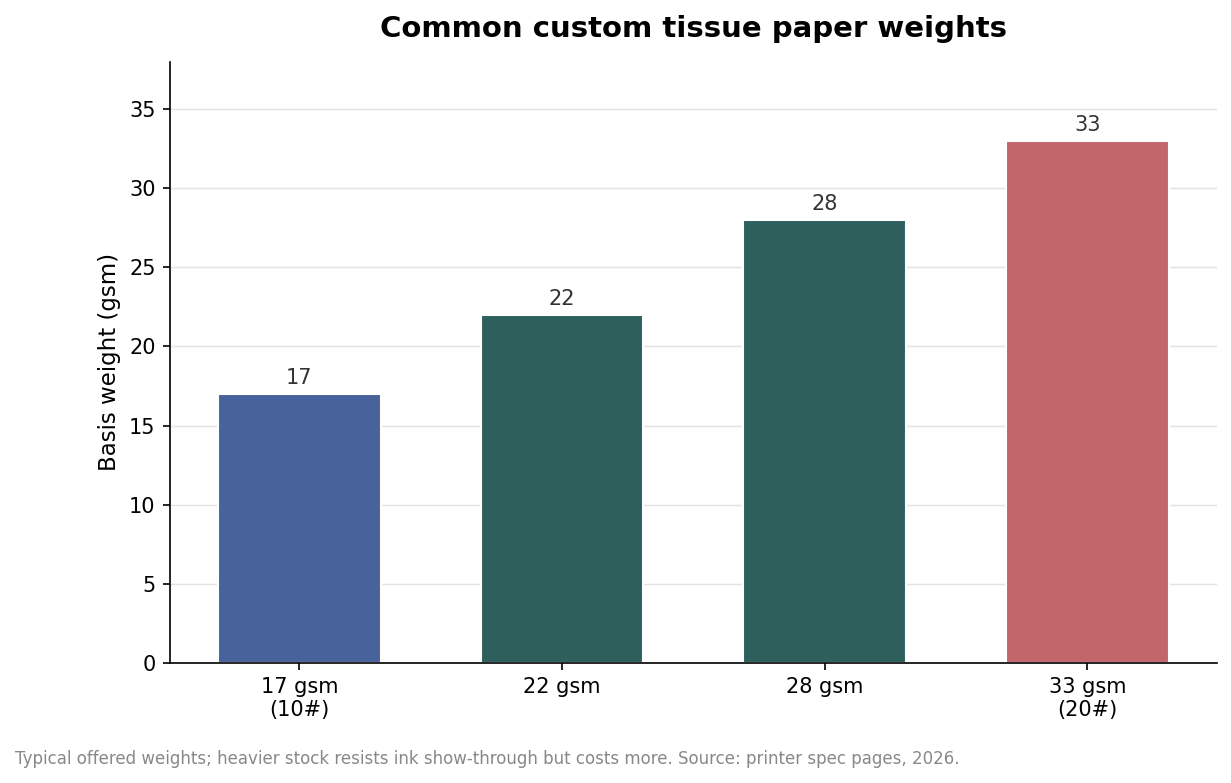
Design to the medium and tissue rewards you. Bold line art, a solid one- or two-color logo, a simple repeated monogram, and clean edge-to-edge patterns all reproduce beautifully. What struggles is anything that relies on fineness: small reversed-out type, delicate gradients, and photographic detail all tend to wick, fill in, or show through from the reverse of a thin sheet. You also choose a print style, and it affects both look and cost. A single spot placement logo uses the least ink and is the most economical; a scatter of small marks reads as branded without heavy coverage; and a full all-over or edge-to-edge print looks richest but uses the most ink and can lengthen drying. Heavier coverage on a heavier sheet also resists show-through, which is one reason weight and print design get specified together.
Matching color and proofing before the run
Specify brand colors as Pantone spot values, ideally from the Solid Coated library, and expect the printer to mix inks to match rather than build the color from process. The catch is the substrate: a Pantone target that is accurate on white tissue will read differently on a natural or dyed sheet, so the only reliable check is a printed proof on your actual stock, not just a digital layout proof that shows position but not true ink-on-tissue. Flexo commonly supports up to around six spot colors, sheet sizes are widely customizable with twenty by thirty inches a common default, and recycled content up to one hundred percent with FSC certification is available on request from many suppliers. Plan on roughly four to six weeks from final artwork approval to delivery, and treat that as indicative rather than a promise until your printer confirms it against their current schedule.
Match the method to the run and the artwork to the surface, and custom tissue is one of the highest-impact, lowest-cost pieces of branding a package can carry. Fight the surface with fine detail and heavy process art, and it becomes an expensive way to disappoint yourself.
Leave a Reply