Custom tissue paper looks like the simplest line on a packaging order, which is exactly why it goes wrong so predictably. It is thin, cheap per sheet, and easy to treat as an afterthought once the boxes and labels are sorted. Then the proof comes back with the logo bleeding through, or the sheets are too small to wrap the product, or a silk garment yellows in storage, and a small item becomes a reprint. The mistakes below are the ones that recur, and every one is avoidable at the specification stage.
Ordering tissue too thin to carry the print
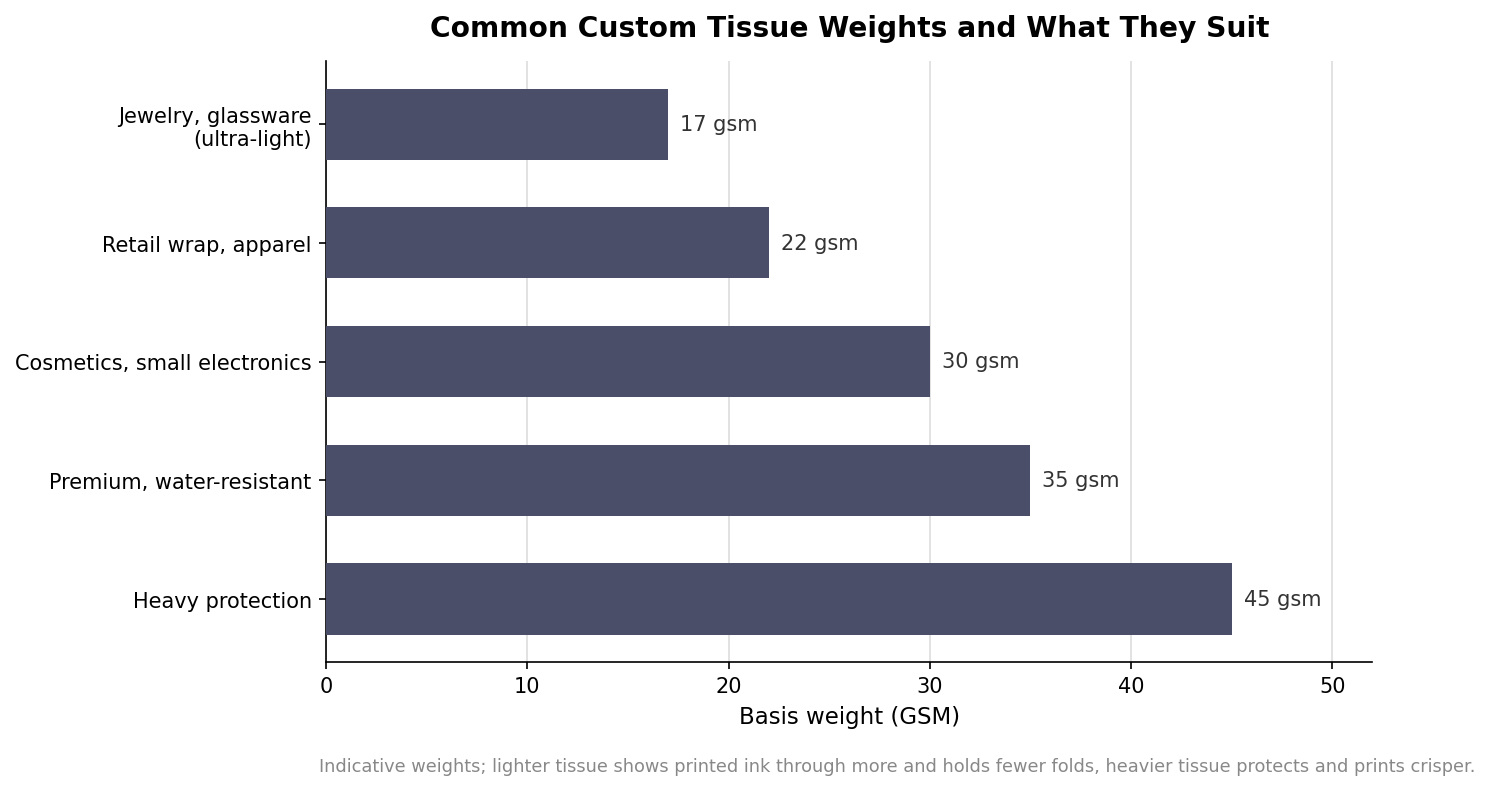
Weight, measured in GSM, is the first thing buyers underestimate. Ultra-light 17 gsm tissue is genuinely useful for jewelry, glassware, and delicate confetti, but it absorbs a lot of ink and lets a dark or heavy design show through to the other side, and it creases and tears sooner. Stepping up to 22 gsm is the quiet default for retail wrapping and apparel because it prints more crisply and survives more folds before it fails. When the artwork is dark, full-coverage, or double-sided, or when the tissue also has to protect a harder product, heavier stock from 30 gsm upward earns its cost by resisting show-through and holding shape. Match the weight to both the print and the product, not to the lowest sheet price.
Designing for coverage the print method cannot deliver cheaply
Tissue is decorated one of two ways, and picking the wrong one for your art inflates the bill. Flexographic printing is the volume workhorse, laying down one or two spot colors, often soy-based, in a repeating pattern across the sheet. It is economical at scale and ideal for a logo or a simple repeat, but each additional spot color and any tight registration adds cost and risk on thin, stretchy stock. Digital printing handles full-color, photographic, or highly detailed art and short runs without a plate, at a higher per-sheet price. The common mistake is designing a complex, many-color, edge-to-edge pattern and then asking for it flexo-printed at a budget rate. Decide the method first, then design within its strengths: keep flexo art to a clean one or two colors, and reserve dense multicolor work for digital.
Skipping acid-free tissue when the product needs it
Regular tissue is mildly acidic, and over months that acidity can yellow and degrade what it touches. Acid-free, pH-neutral tissue is the fix, and it matters most for exactly the products boutiques care about: silk and fine apparel, photographs and printed keepsakes, jewelry, and anything meant to be stored rather than unwrapped the same day. It is the reason luxury fashion houses and even museums default to acid-free for long-term contact, where ordinary tissue can leave visible discoloration on light fabrics within a season or two of storage. If your tissue is purely a one-time unboxing flourish that the customer discards, standard stock is fine; if it stays wrapped around a garment or heirloom, specify acid-free and treat it as protection rather than decoration.
Guessing the sheet size against the product
A sheet that is a few inches short is worse than useless because it cannot actually enclose the product. Tissue is commonly cut to sizes in the range of 15 by 20 inches or 20 by 30 inches, and many printers will also cut a custom size if your product falls between the standards. The right choice depends on the footprint you need to wrap and how much overlap you want for a clean fold. Measure the largest item the sheet must cover and add enough margin to fold over and tuck, rather than ordering a standard size and hoping. A sheet that is slightly generous drapes and folds elegantly; one that is slightly small looks skimpy and leaves the product peeking out, which undercuts the premium feel the tissue was supposed to create.
Underestimating minimums, lead time, and fresh-ink rub
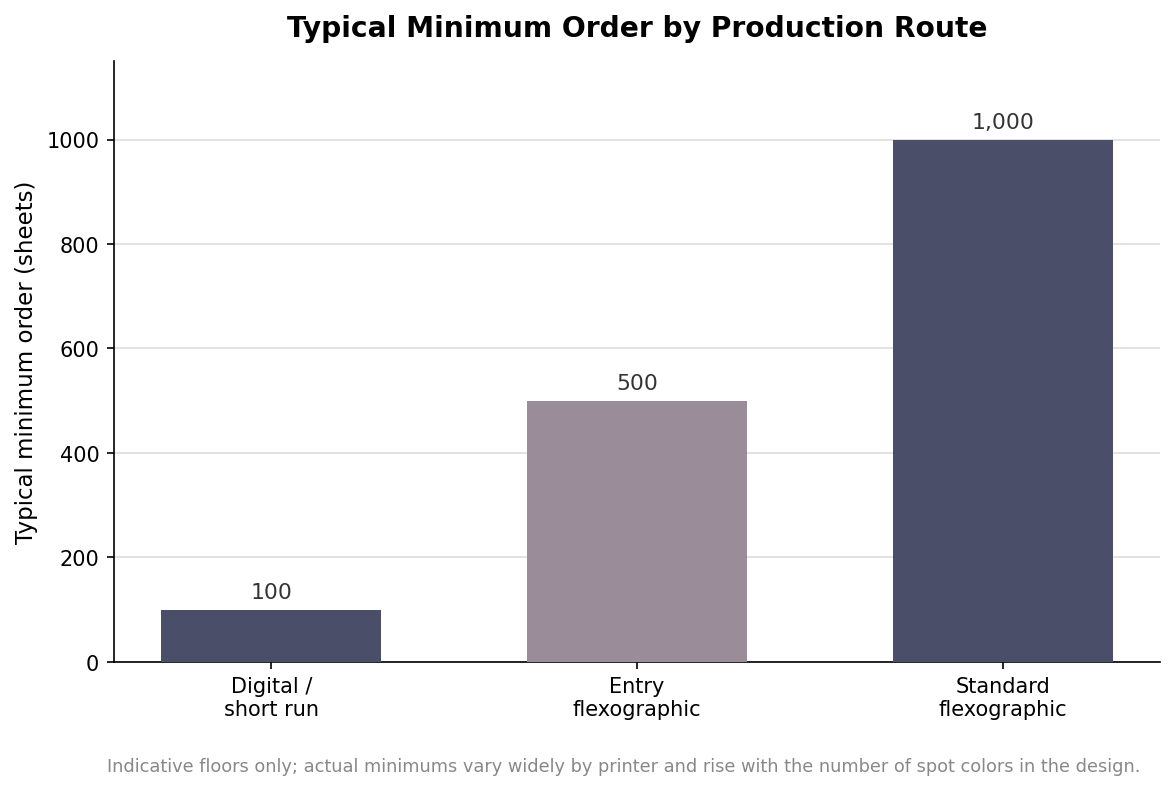
Minimum order quantities swing widely, and buyers who assume a small trial run is available are often surprised. Short-run digital printing can start around 100 sheets, while flexographic production commonly sets its floor near 500 to 1,000 sheets and higher as spot colors are added, because the plates and setup only pay off across volume. Production itself is usually quick, on the order of 7 to 10 business days, but that clock starts after you approve a proof and does not include shipping. Two smaller traps hide in the timeline. Freshly printed tissue needs its ink to cure, and rushing folding or packing can cause set-off, where the design rubs onto the facing sheet or the product. And a rejected proof restarts the schedule, so approve color and placement carefully the first time. Order earlier than feels necessary, confirm the minimum before you fall in love with a design, and build in the proof round. It also pays to ask for pricing at two quantities, since the per-sheet cost often drops sharply once you clear the next volume break, and a modest bump in order size can lower your unit price more than it raises the total.
Getting it right in one pass
None of these mistakes require expertise to avoid, only sequence. Choose the weight for your print and product, pick the print method before finalizing the art, specify acid-free whenever the tissue will sit against something valuable, size the sheet to the item with margin to fold, and confirm the minimum and lead time before you commit. Handled in that order, custom tissue does what it is supposed to do, which is make an ordinary box feel deliberately, quietly premium the moment it opens.
Leave a Reply